Sunday, 27 August 2017

CTC#143 - Artistic Expression


Hello everyone! I hope you are having a lovely weekend. If you came from Monique's blog, thank you for hopping on to my blog. We are a group of demonstrators that love to take inspiration from Stampin' Up's! amazing catalogues and once a week choose a section to CASE (Copy & Selectively Edit). Every catalogue has a huge amount of projects to use as a jumping off point for your own creation. This week we are covering the Artistic Expression section pages 132 -181. 


It is a huge section so it was really hard to narrow down what I wanted to case, but I ended up being drawn to this card on page 134.


I love the soft muted background and how the butterfly die extends out from the confines of the matt. 


For my CASE  I used the Postscript background stamp inked up and then spritzed lightly with water before stamping onto a crumb cake watercolour wash. My large Butterfly thinlit is a piece of vellum firstly embossed with the Softly Falling embossing folder before die cutting it. 


Some inside love!

After you have hopped around to each of the Design Crew blogs, why don't you join in on our challenge? Just click the badge below.


To continue on to Fi's blog and see some sweet colouring, click the badge below.


Thank you for stopping by!

Cheers Megan xx


Product List

Saturday, 26 August 2017

Global Design Project 101

Happy weekend everyone!

Just stopping by to share a card I did for the Global Design Project. This week it was a colour challenge.

To see what the design team cooked up or for more info on joining in on the challenge, click the image above.


For my card I had a bit of fun with different embossing ideas, other than sticking the card stock in an embossing folder and running it through the big shot. Firstly, the white piece behind the Eastern Medallion was created using the Simply Scored Scoring Tool. I "simply" placed the piece on the board and scored the horizontal lines with even spaces, much more interesting than a plain piece of white paper don't you think?

Secondly, for the navy piece I used two of the dies from the Eastern Medallion Thinlits Dies and ran them through the Big Shot on top of a rubber mat so that they didn't cut through and only left an impression. My rubber mat is a specific Sizzix one (I think) that I had already in my craft stash, however online I have seen tutorials using other household/hardware items. If you search "embossing with dies" on Google or You Tube lots will come up with all different types of things used for the soft cushy part of the big shot "sandwich", I think I remember someone using a folded up Chux. It is then just a matter of experimenting with your big shot sandwich to get the right pressure.


The inside is always super quick to decorate when you use washi tape and leftover elements from the designing of the front of the card!

Thank you for stopping by today!
Cheers Megan


Product List

Sunday, 20 August 2017

CTC142 - Love & Sympathy


Hello lovelies! Welcome to another CASEing the Catty Crew blog hop. If you came from Sandra's blog, thank you for continuing on to my blog, wasn't her card just beautiful. We are a group of demonstrators that love to take inspiration from Stampin' Up's! fabulous catalogues and once a week choose a section to CASE (Copy & Selectively Edit). Every catalogue has an amazing array of projects to use as inspiration for your own projects. This week we are covering the section, Love & Sympathy, found on pages 86 - 101.
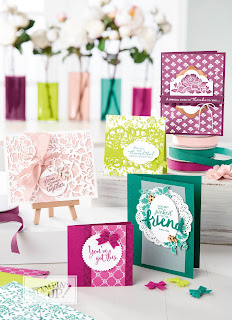

My project this week is a CASE of the Tranquil Tide card, pictured below on the bottom very right.


Instead of making a card this week, I've made a decoration for the front of my Love Today Planner, it can be found on pages 12-13 of the Stampin' Up! Annual Catalogue.


I wanted to personalise my planner so it didn't look like everybody else's and when we get together there is no chance of going home with the wrong one! This is my planner with my CASE, you can see that I have taken the circular element with flourishes on either side and made it my own, literally, I've put my name on it!


To say I love my planner, is an understatement. Not only is it awesome for planning everything in my life but it is pretty too! I have been a bit precious with it though and hesitant to throw it into my bag and cart here and there as I was worried it would get a bit worse for wear and now I have a pretty decoration on the front (truth be told the cover is quite durable and as I said, I'm being a bit precious).  So what I did was cover it with the thinnest clear tablecloth plastic that you can buy. My local Spotlight store sells it by the metre. I covered it just like I would a school text book, securing it on the insides with washi tape (is there no end to it practical uses?!). The flexibility of the plastic meant I could pull it really taunt and it now has a really professional finish, if I may say so!


You can join in on the fun too and participate in the challenge for more details click the badge below.


Thank you so much for stopping by, it's now time for you to continue and hop on over to Monique, just click the badge below to see what she has for you, I bet you won't be disappointed.


Cheers Megan xx

Product List